Monitor stands are ergonomic tools that lift and position your screen to promote a healthy, neutral posture. They work by using adjustable arms or risers to align the top of your monitor at or slightly below eye level. This simple adjustment reduces strain on your neck, shoulders, and back, turning your desk into a more comfortable and productive workspace.
Key Takeaways
- Posture Correction is the Primary Goal: A monitor stand works by elevating your screen to eye level, preventing you from slouching or craning your neck, which directly reduces musculoskeletal strain.
- Mechanics Vary by Type: Stands function through simple risers, gas-spring arms, or motorized lifts, each offering different levels of adjustment and stability to suit user needs.
- Ergonomic Alignment is Key: Proper setup follows the 20-20-20 rule and positions the screen about an arm’s length away, with the top third at or just below eye level for optimal viewing.
- They Free Up Valuable Desk Space: By lifting the monitor, the space underneath becomes usable for keyboards, notebooks, or other essentials, helping to declutter your work surface.
- Cable Management is a Built-In Benefit: Most quality stands include channels or clips to route and hide cables, contributing to a cleaner, safer, and more focused environment.
- Compatibility is Crucial: A stand only works if it supports your monitor’s weight and size and connects via the correct VESA mount pattern (like 75x75mm or 100x100mm).
Discover How Monitor Stands Work to Improve Posture
Do you end the workday with a stiff neck or an aching back? Your monitor’s height might be the culprit. Most desks place our screens too low. This forces us to look down for hours. A monitor stand is a simple yet powerful tool to fix this. This guide will show you exactly how monitor stands work. You will learn the mechanics behind them. We will cover how they turn your desk into an ergonomic haven. Let’s dive in and lift your screen to a healthier height.
Chapter 1: The Core Principle – Why Height Changes Everything
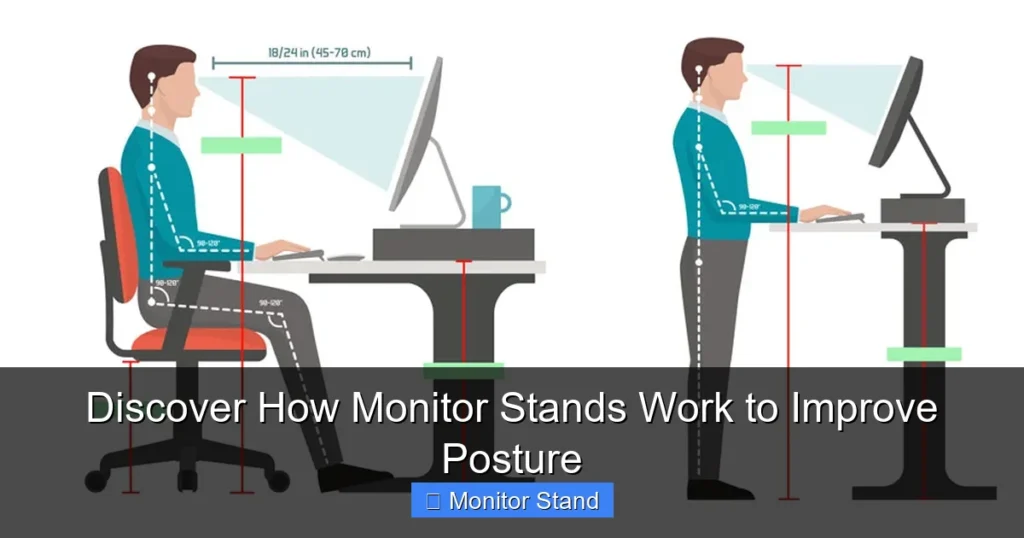
Think of your spine as a stack of building blocks. When your head is balanced directly over your shoulders, everything is aligned. This is a neutral posture. Now, think about looking down at your phone or a low monitor. Your head tilts forward. For every inch it tilts, the weight your neck muscles must support increases dramatically. This is “text neck.”
Visual guide about Discover How Monitor Stands Work to Improve Posture
Image source: 4.bp.blogspot.com
A monitor stand works on one basic principle: it brings the screen to you, so you don’t go to the screen. By elevating the monitor, it encourages you to sit upright. Your gaze becomes level. Your shoulders relax. Your spine stays in its natural, S-shaped curve. This isn’t just about comfort. It’s about preventing long-term injury and fatigue. Proper alignment means better blood flow. It means less strain on your discs and muscles. It means you can focus on your work, not your pain.
Chapter 2: The Inner Workings – Types of Monitor Stands and How They Function
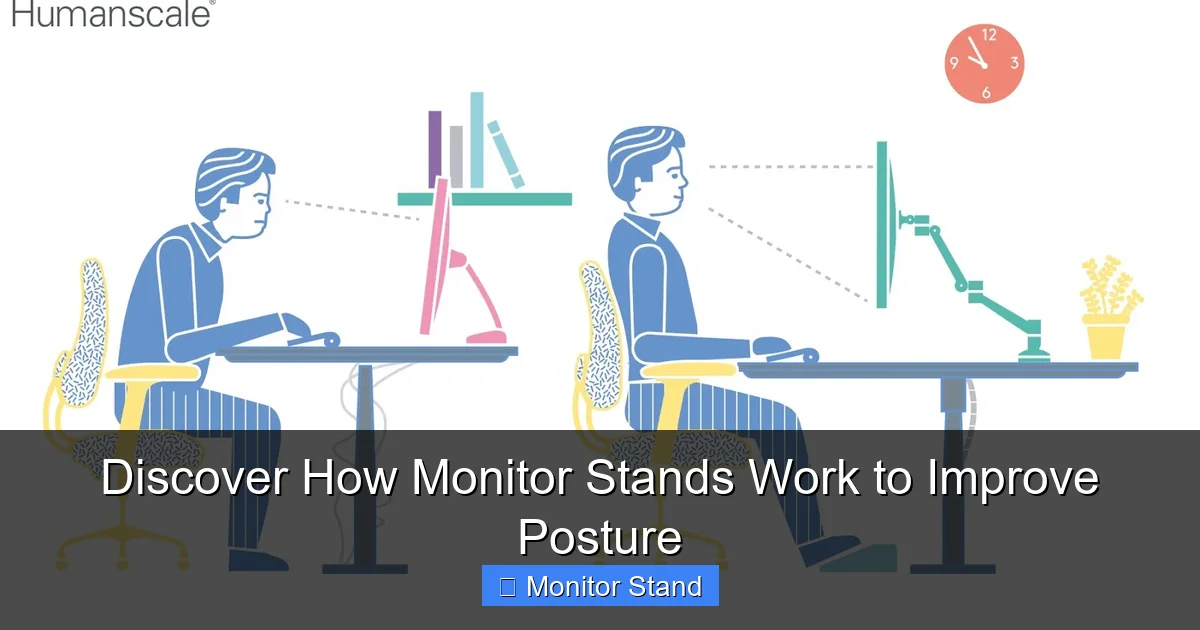
Not all monitor stands are created equal. They use different mechanisms to achieve the same goal. Understanding these will help you pick the perfect one.
Visual guide about Discover How Monitor Stands Work to Improve Posture
Image source: ispineclinics.com
1. The Monitor Riser or Stand Base
This is the simplest type. It’s often a solid platform or a set of legs. You place your monitor directly on top of it. How it works is straightforward: It adds a fixed height, typically between 2 to 8 inches, to your monitor’s base. Some models offer a small tilt function. The main job here is elevation and creating storage space below. It’s a passive, set-and-forget solution. Great for basic posture improvement and decluttering.
2. The Gas Spring Monitor Arm
This is the versatile athlete of monitor stands. It uses a gas-filled piston (gas spring) inside the arm. This piston is calibrated to perfectly counterbalance the weight of your monitor. Here’s how it functions step-by-step:
- The Counterbalance: The gas spring provides constant upward force. When you loosen a tension knob, this force lets you move the monitor with very little effort.
- Full Range of Motion: You can adjust the height up and down, push it closer or farther, tilt it forward/backward, swivel it left/right, and even rotate it into portrait mode. The arm moves in three dimensions.
- Float and Lock: Once positioned, you tighten the knob (or it auto-locks). The monitor stays firmly in that exact spot, floating in space without desk contact.
This mechanism offers the most ergonomic flexibility, allowing you to change positions throughout the day.
3. The Monitor Mount with Mechanical Arm
Similar to the gas spring arm but uses different mechanics. Instead of a gas piston, it employs springs, counterweights, or friction-based tension systems. You adjust the tension manually via a bolt or knob to match your monitor’s weight. The movement is the same—articulating in multiple directions—but the feeling can be more mechanically precise. These are often very robust and durable.
4. The Motorized or Electric Standing Desk Converter
This is a monitor stand on a larger scale. It’s a platform that sits on your desk. At the press of a button, an electric motor lifts the entire platform, along with your monitor, keyboard, and mouse, to a standing height. The mechanism is similar to a small standing desk. It transforms any regular desk into a sit-stand workstation. The “stand” here works by motorized vertical movement, promoting posture change through position change.
Chapter 3: Your Step-by-Step Guide to Ergonomic Setup
Buying a great stand is only half the battle. Setting it up correctly is where the magic happens. Follow these steps to unlock its full posture-improving potential.

Visual guide about Discover How Monitor Stands Work to Improve Posture
Image source: i.ytimg.com
Step 1: Gather and Check Compatibility
First, know your monitor’s details. Find its VESA mount pattern on the back (e.g., 75x75mm). Check the stand’s weight and size limits. Ensure your monitor falls within both. Have a screwdriver and the included hardware ready.
Step 2: Assemble and Attach the Mounting Plate
Follow the manufacturer’s instructions to assemble the arm or riser. For arms, you’ll attach a metal plate to the back of your monitor using the provided screws. Make sure it’s secure but don’t overtighten.
Step 3: Install the Stand on Your Desk
For clamp mounts: Position the C-clamp on the rear edge of your desk. Ensure the desk material can handle the pressure (a thin or glass desk may need a grommet mount instead). Tighten the clamp firmly. For risers: Simply place the platform in your desired location.
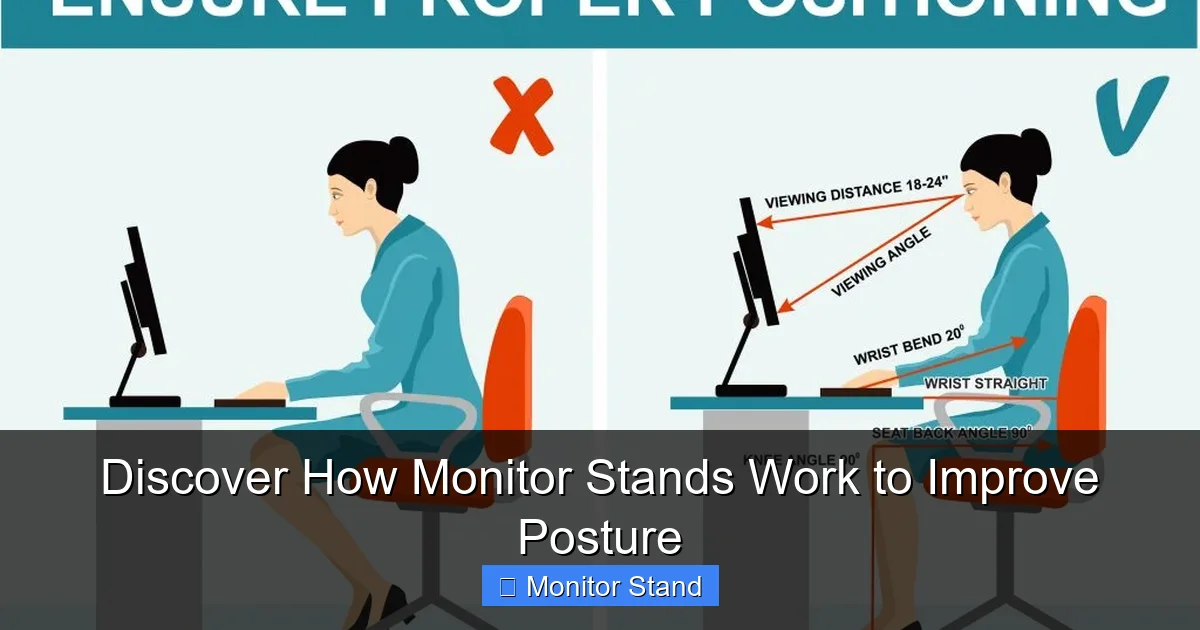
Step 4: The Golden Rule of Positioning
This is the most important step. Sit in your chair as you normally would. Relax your shoulders.
- Distance: Your monitor should be about an arm’s length away from your eyes.
- Height: Adjust the stand so the top third of the screen is at or slightly below your eye level. Your eyes should look slightly downward at the center of the screen. This keeps your neck in a neutral position.
- Tilt: Angle the screen back very slightly (about 10-20 degrees) to reduce glare and match your natural line of sight.
Step 5: Tame the Cables
Use the built-in cable channels on the arm. Route your power, video, and USB cables through them. This prevents dangling wires. It also makes your adjustments smooth and your space tidy.
Step 6: Fine-Tune and Test
Move the monitor through its full range. Type a document. Browse a webpage. Does your neck feel relaxed? Are your eyes comfortable? Make tiny adjustments until everything feels effortless. Remember the 20-20-20 rule: Every 20 minutes, look at something 20 feet away for 20 seconds. Your properly positioned stand makes this easy.
Chapter 4: Troubleshooting Common Monitor Stand Issues
Even the best setup can have hiccups. Here’s how to fix common problems.
Issue 1: Monitor Wobble or Sagging.
This is often a tension issue. For gas spring arms, locate the tension adjustment knob (usually at the joint holding the monitor). Turn it clockwise to increase tension and better hold the weight. Do this in small increments. For mechanical arms, check the manual for the specific tension bolt to tighten.
Issue 2: Difficulty Moving the Arm.
If the arm is too stiff, you may have over-tightened it. Loosen the tension knob slightly. Also, ensure no cables are snagging inside the management channels, as this can restrict movement.
Issue 3: Desk Clamp Won’t Fit or Feels Unstable.
Check your desk thickness against the clamp’s maximum. If it’s too thick, see if the clamp has an extension. If the desk has a pronounced lip, ensure the clamp jaws are gripping a flat, vertical surface. For stability, always place the clamp on a solid rear edge, not on a drawer slide or overhang.
Issue 4: Screen is Not Level.
This is usually due to an uneven mounting plate attachment. Detach the monitor from the arm. Loosen the screws on the VESA plate, re-seat it evenly, and retighten in a cross pattern (top-left, bottom-right, top-right, bottom-left).
Conclusion: Elevate Your Work, Elevate Your Health
A monitor stand is more than a desk accessory. It’s a foundational tool for workplace wellness. It works by applying simple principles of ergonomics and physics. It lifts, adjusts, and supports your screen to support you. The result is a straighter spine, more relaxed muscles, and a clearer mind. Whether you choose a simple riser or a full-motion arm, the investment in your posture pays daily dividends. Start today. Adjust your screen, align your body, and feel the difference. Your future self will thank you for every pain-free hour at your desk.