Optimizing your study desk height is the foundation of a comfortable, productive, and healthy workspace. This guide will walk you through the precise measurements and adjustments needed to align your body correctly, reducing strain on your neck, back, and wrists. You’ll learn not only the ideal desk height but also how to properly position your monitor, chair, and accessories for a complete ergonomic setup.
Key Takeaways
- Elbows at 90 Degrees: The golden rule for desk height is having your elbows bent at a 90-degree angle when your hands are on the desk.
- Chair Height is Key: Always set your adjustable chair height first, as this dictates the correct desk height for your body.
- Monitor Stands are Essential: A monitor stand or riser is crucial for bringing your screen to the correct eye level, preventing neck strain.
- Feet Must Be Flat: Your feet should rest flat on the floor or a footrest to support your lower back and promote circulation.
- Wrists Should Be Straight: Your keyboard should be positioned so your wrists are straight and in line with your forearms, not bent upwards or downwards.
- Adjustability Solves Everything: Investing in a sit-stand desk or simple desk risers provides the flexibility to find and change your perfect height throughout the day.
- Posture is Dynamic: Good posture isn’t about staying rigid; it’s about having a supported, neutral position that you can comfortably maintain.
Optimize Your Study Desk Height for Better Posture
Do you end a long study session with a stiff neck, sore shoulders, or a nagging ache in your lower back? The culprit might not be the material you’re studying, but the desk you’re studying at. An improperly set up desk forces your body into awkward positions. Over time, this leads to fatigue, discomfort, and even long-term musculoskeletal issues.
The good news is that fixing this is within your control. Optimizing your study desk height is a simple yet powerful way to transform your workspace. It boosts comfort, enhances focus, and protects your health. This guide will provide you with a clear, step-by-step plan to find your perfect desk height and create an ergonomic sanctuary for learning.
Why Desk Height is the Cornerstone of Good Posture
Think of your body as a stack of building blocks. When each block is aligned properly, the structure is stable and strong. Your feet are the foundation, your pelvis and spine are the central pillar, and your shoulders, neck, and head are the top levels. Your desk and chair are the external supports for this structure.
Visual guide about Optimize Your Study Desk Height for Better Posture
Image source: cdn.autonomous.ai
If your desk is too high, you’ll subconsciously raise your shoulders to reach it. This strains your trapezius muscles and can compress nerves in your shoulders. You might also bend your wrists upward when typing, risking repetitive strain injuries.
If your desk is too low, you’ll hunch over. This rounds your shoulders and forces your neck to crane forward to see your screen. This “tech neck” posture places immense stress on your cervical spine and can lead to chronic pain and headaches.
The goal is a neutral posture. This means your joints are naturally aligned, and your muscles are relaxed, not working overtime to hold you in place. Getting your desk to the right height is the first and most critical step to achieving this.
What You’ll Need to Get Started
Before we begin measuring, gather a few things:
Visual guide about Optimize Your Study Desk Height for Better Posture
Image source: cdn.shopify.com
- Your current desk and chair.
- A tape measure.
- A friend to help (optional, but useful).
- A book or a small, flat box (as a temporary monitor stand).
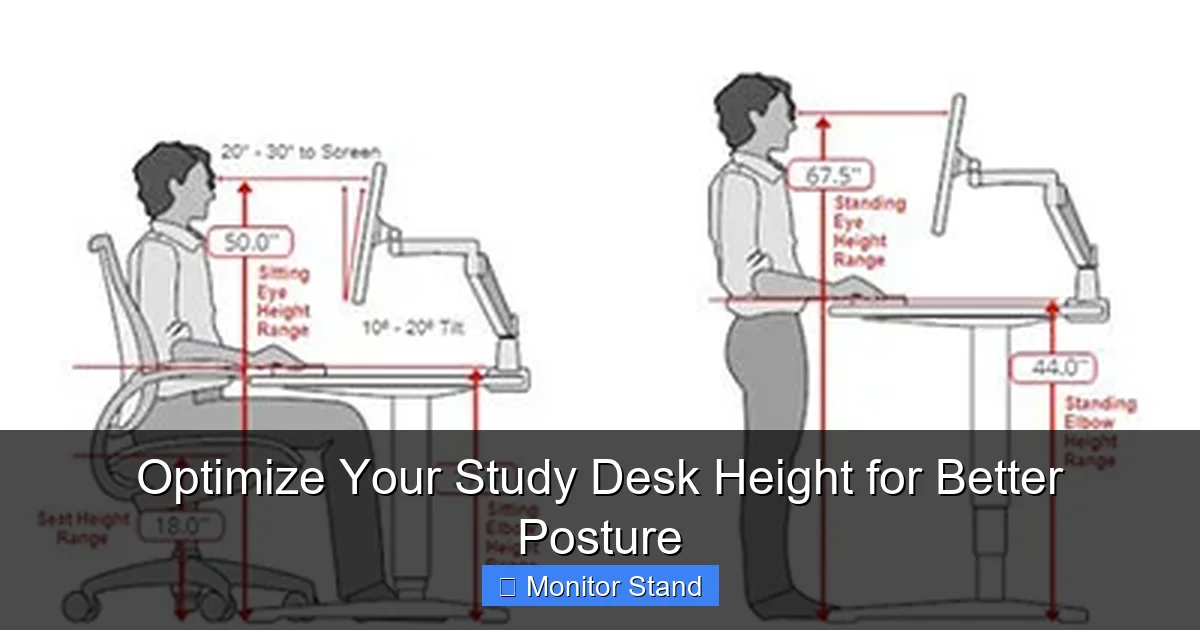
Step 1: The Foundation – Setting Your Chair Height
You must start with your chair. Your desk height is dependent on it. Follow these sub-steps to get your chair positioned perfectly.
Visual guide about Optimize Your Study Desk Height for Better Posture
Image source: bestofficechair.org
1.1. Sit Back in Your Chair
Scoot your hips all the way back so your back is supported by the chair’s backrest. Sit up tall, imagining a string pulling the crown of your head toward the ceiling.
1.2. Adjust for a 90-Degree Knee Bend
Adjust your chair height up or down so that your knees are bent at approximately a 90-degree angle. Your thighs should be parallel to the floor or sloping slightly downward.
1.3. Check Your Feet
This is crucial. Your feet must rest flat on the floor. If they dangle, your chair is too high. Lower it until your feet are flat. If you can’t lower the chair enough or your feet still don’t reach comfortably, you need a footrest. This is a non-negotiable item for proper support.
Step 2: Finding Your Magic Number – Ideal Desk Height
Now, with your chair correctly set, you can find your ideal desk height.
2.1. Assume the Typing Position
Relax your arms at your sides. Then, bend your elbows to bring your forearms parallel to the floor, as if you were about to type on an imaginary keyboard. Your upper arms should hang naturally close to your torso.
2.2. Measure from the Floor
Have your friend measure from the floor up to the point just below your bent elbow (where your wrist starts). This measurement in inches or centimeters is your target desk height.
Pro Tip: No helper? Sit in your adjusted chair, hold a ruler horizontally under your elbow, and mark where it hits a wall or cabinet. Then, measure from that mark to the floor.
2.3. Compare and Calculate
Now, measure the height of your current desk surface from the floor. Compare it to your target height.
- If your desk is too high (by more than an inch), you need to lower it or raise your chair (and use a footrest!).
- If your desk is too low, you need to raise it. This is where accessories become vital.
Step 3: Raising Your Desk and Monitor (The Monitor Stand’s Moment)
Most standard desks are too low for optimal monitor placement. This is the single most important reason to use a monitor stand.
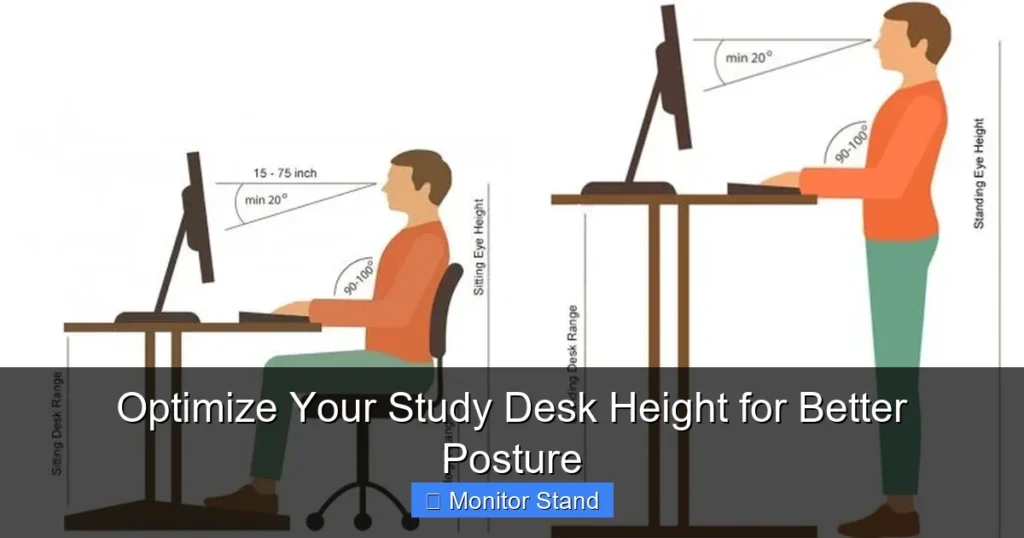
3.1. The Eye-Level Rule
The top third of your monitor screen should be at or slightly below your natural eye level. When you look straight ahead, your gaze should land about 2-3 inches below the top of the monitor. This allows your neck to stay in a neutral, relaxed position.
3.2. Choosing and Using a Monitor Stand
A monitor stand, riser, or arm serves two key functions:
- Raises the Screen: It brings your monitor up to the correct eye level without raising your entire desk surface, which would make typing uncomfortable.
- Creates Valuable Space: The area underneath the stand is perfect for storing keyboards, notebooks, or even a laptop when not in use.
How to Set It Up: Place your monitor on the stand. Sit in your posture-perfect chair and look straight ahead. Adjust the stand’s height (or use books under it) until the screen meets the eye-level rule. You should be able to view the entire screen with just a slight downward tilt of your eyes.
3.3. Solutions for a Desk That’s Too Low Overall
If your entire desk surface needs to be higher for proper elbow angle, consider:
- Desk Risers/Leg Extenders: These are sturdy blocks that fit under each desk leg.
- A Standing Desk Converter: This is a height-adjustable platform that sits on top of your existing desk. It allows you to lift your entire workspace—monitor, keyboard, and mouse—to the perfect height, and even switch between sitting and standing.
Step 4: Finalizing Your Ergonomic Setup
With your desk and monitor at the right heights, fine-tune these last elements.
4.1. Keyboard and Mouse Placement
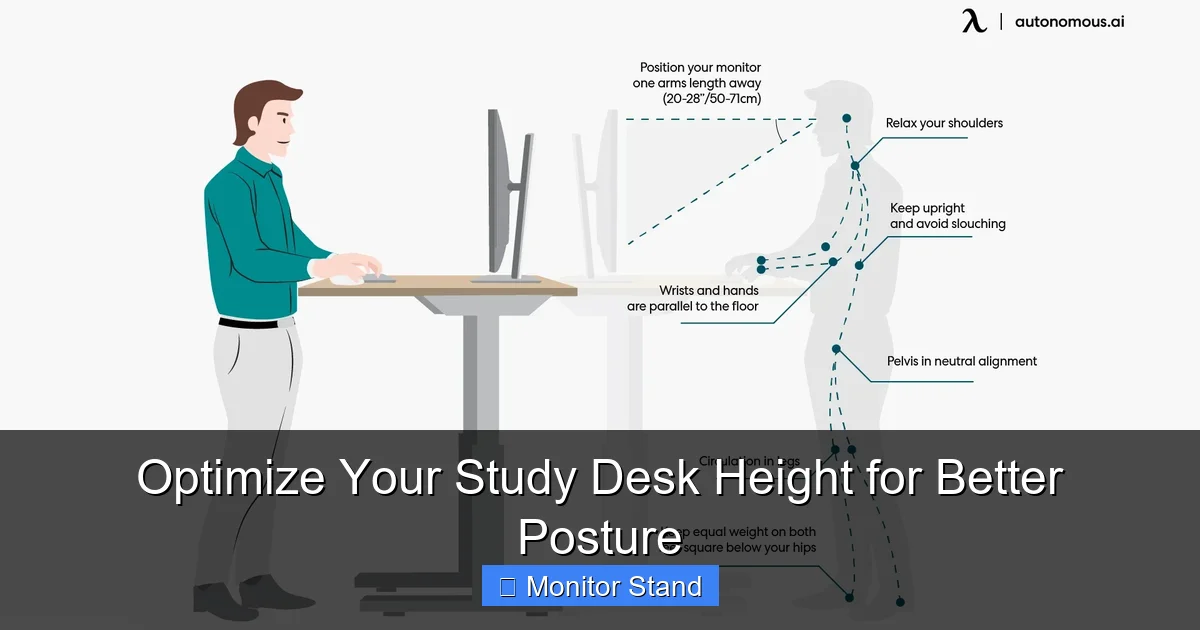
Your keyboard and mouse should be on the same surface, close enough that you can use them with your elbows still at that 90-degree angle and tucked near your body. Your wrists should be straight, not resting on a sharp desk edge. A thin, soft wrist rest can help maintain this neutral position during pauses.
4.2. Distance from Monitor
An arm’s length is a good rule of thumb. You should be able to comfortably reach out and just touch the screen with your fingertips.
4.3. Lighting and Glare
Position your desk so that light sources (windows, lamps) are to the side of your monitor, not directly behind or in front of it, to avoid glare and eye strain.
Troubleshooting Common Desk Height Problems
Problem: “My desk isn’t adjustable, and it’s too high.”
Solution: Raise your chair until your elbows are at 90 degrees. You must use a footrest to support your feet. Also, ensure your monitor is high enough—you may need a taller stand.
Problem: “I share a desk with someone of a different height.”
Solution: Invest in an adjustable chair with a simple height lever and personal footrests. Use a monitor arm that can be easily repositioned up and down for each user.
Problem: “I use a laptop exclusively.”
Solution: Laptops are terrible for posture as the screen is tied to the keyboard. The best fix is to treat it like a desktop: get a separate keyboard and mouse, place the laptop on a stand (or stack of books) to raise the screen to eye level, and use the external keyboard on the desk.
Problem: “I still feel some discomfort.”
Solution: Re-check all measurements. Small tweaks make a big difference. Also, remember posture is dynamic. Set a timer to remind yourself to get up, stretch, and shift positions every 30-45 minutes.
Conclusion: Your Path to Pain-Free Studying
Optimizing your study desk height isn’t about buying the most expensive furniture. It’s about understanding the simple mechanics of your body and creating a supportive environment. By taking the time to measure, adjust, and accessorize—especially with a monitor stand—you are investing directly in your comfort, concentration, and long-term physical well-being.
Start today. Measure your elbow height. Adjust your chair. Lift that screen. Feel the immediate difference as your shoulders drop, your neck relaxes, and your mind is free to focus on what truly matters: your studies. Your future self will thank you for it.