Tired of dusty ceiling fans but dreading the ladder? Discover 3 simple, ladder-free methods using items you already own. This guide shows you how to clean fan blades safely and effectively in minutes, keeping your home healthier and your fans running smoothly.
Key Takeaways
- Skip the ladder completely: Use a microfiber mop, vacuum attachment, or microfiber duster on a pole for safe, easy reach.
- Always turn the fan OFF and cool: Never clean a moving or hot fan – safety first!
- Clean both sides of blades: Dust builds up on the top (facing ceiling) and bottom (facing room) surfaces.
- Work from the center out: Start dusting near the motor housing and move towards the blade tip to prevent dislodging dust onto cleaned areas.
- Do it regularly: Aim for every 2-4 weeks to prevent heavy buildup and keep your fan efficient.
- Use the right tool for the job: Microfiber is king for trapping dust; avoid feather dusters that just spread it around.
Stop Climbing! Dust Ceiling Fans Easily Without Ladders (For Good!)
Let’s be honest: ceiling fans are amazing for airflow and style, but they are dust magnets. Those blades spin through the air constantly, grabbing every speck of dust, pet hair, and dander floating around. Before you know it, they look grimy, and that dust gets blown right back into your living space. The biggest hurdle? Getting up there to clean them. Ladders are wobbly, take up space, and honestly, who wants to risk a fall just for dusting? The good news is, you absolutely do not need a ladder to get your ceiling fan sparkling clean. This guide reveals the easiest, safest methods to dust ceiling fans using tools you likely already have, saving you time, hassle, and potential injury. You’ll learn how to clean both sides of the blades effectively, keep your fan running efficiently, and breathe easier in your home – all from the safety of the floor.
Why Dusting Ceiling Fans Matters (Beyond Just Looks)
Before we dive into the “how,” let’s talk about the “why.” Ignoring dusty fan blades isn’t just an eyesore; it has real consequences:
* Reduced Air Quality: That dust you see? It’s being circulated every time the fan runs. This can aggravate allergies, asthma, and other respiratory issues, especially for sensitive individuals. Clean blades mean cleaner air.
* Decreased Fan Efficiency: Heavy dust buildup creates uneven weight on the blades. This can cause the fan to wobble, vibrate excessively, and work harder to spin, leading to higher energy bills and potentially shortening the motor’s life.
* Fire Hazard (Rare but Possible): While uncommon with modern fans, extremely heavy, flammable dust buildup *combined* with a malfunctioning motor *could* pose a risk. Regular cleaning is a simple preventative measure.
* Longer Cleaning Sessions: Dust that’s been baked on by the fan’s motor heat is much harder to remove than fresh dust. Cleaning regularly (every 2-4 weeks) makes each session quicker and easier.
Essential Prep: Safety & Setup Before You Start
Don’t skip this step! A little prep ensures a smooth, safe, and effective cleaning session.
1. Power Down & Cool Down
This is non-negotiable. Always turn the fan OFF at the wall switch (not just the remote or pull chain). For absolute safety, turn off the circuit breaker controlling the fan if you’re comfortable doing so. Wait until the blades are completely stopped and the motor housing is cool to the touch. Never attempt to clean a moving or hot fan – the risk of injury is too high.
Visual guide about Quick Tip How to Dust Ceiling Fans Easily Without Ladders
Image source: 5.imimg.com

Visual guide about Quick Tip How to Dust Ceiling Fans Easily Without Ladders
Image source: 5.imimg.com
2. Clear the Area
Move any furniture, lamps, or decorations directly underneath the fan. Lay down an old towel or sheet on the floor below the fan. This catches any dust that inevitably falls during cleaning, making your final sweep much easier. It also protects your floors from potential drips if you use a slightly damp method (more on that later).
3. Gather Your Ladder-Free Tools
The magic happens with these common items. Choose the method that works best for you (detailed next):
- Method 1 (Best for Most): A microfiber mop (the flat kind with a washable pad) or a microfiber duster on a telescoping pole (like those used for windows or high shelves). *This is the gold standard.*
- Method 2 (Good for Light Dust): Your vacuum cleaner with a soft brush attachment or upholstery tool.
- Method 3 (Quick Touch-Up): A clean, dry microfiber cloth wrapped securely around a broom handle or paint stirrer.
- Optional but Helpful: A small step stool (only for *reaching* the tool, NOT for standing on near the fan), a second clean microfiber cloth for wiping, and a mild all-purpose cleaner diluted in water (use sparingly and only if needed for sticky residue).
Crucial Tip: Ensure your chosen tool (mop head, duster, cloth) is clean and dry before starting. A dirty tool just spreads grime around.
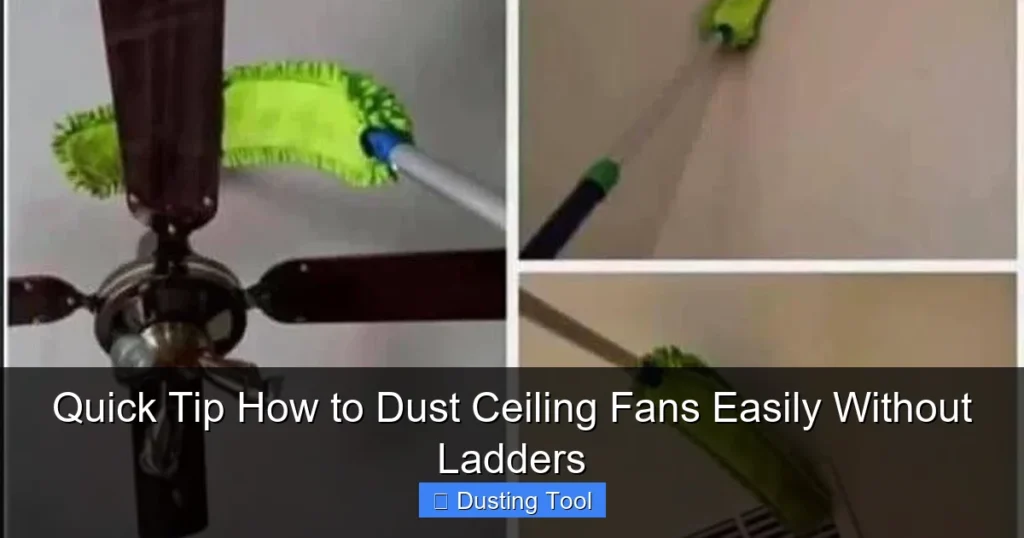
Method 1: The Microfiber Mop/Duster Pole (The Easiest & Most Effective)
This is the recommended method for most people. Microfiber’s electrostatic charge traps dust instead of flicking it into the air like feather dusters. The pole gives you safe reach.

Visual guide about Quick Tip How to Dust Ceiling Fans Easily Without Ladders
Image source: 11magnolialane.com
Step 1: Position Your Tool
Extend your telescoping pole to its maximum safe length (don’t overextend!). Hold the pole firmly with both hands, one near the base for control and one higher up for leverage. Position the microfiber head (mop pad or duster) so it’s flat against the TOP surface of one blade (the side facing the ceiling). Start near the motor housing.
Step 2: Dust the Top Surface (Ceiling Side)
Apply gentle, even pressure. Slowly slide the microfiber head from the center of the blade (near the motor) out towards the tip. This direction prevents dust from being pushed onto areas you’ve already cleaned. Use smooth, overlapping strokes. Cover the entire top surface of the blade. Repeat for each blade. Focus on one blade at a time for best results.
Step 3: Flip & Dust the Bottom Surface (Room Side)
Now, carefully reposition the microfiber head to clean the BOTTOM surface of the same blade (the side facing the room). Again, start near the motor housing and slide outwards towards the tip. The bottom side often collects more visible dust. Repeat this process for every blade.
Step 4: Tackle the Motor Housing & Light Kit (If Applicable)
Use the same microfiber head on your pole to gently dust the motor housing (the central box). Be careful around any light sockets or glass shades. For light kits, you might need to remove the glass shade (usually unscrews or clips off) to clean underneath – do this only if the fan is OFF and cool, and replace it securely afterward. Wipe the shade itself with a dry microfiber cloth.
Step 5: Final Wipe & Clean Up
Once all blades and the housing are dusted, do a quick pass over any areas that might have missed dust. Remove the microfiber pad or duster head and shake it out well outside, or rinse the mop pad thoroughly. Wipe down the pole if needed. Finally, remove the towel/sheet from the floor and vacuum or sweep up the collected dust.
Method 2: The Vacuum Attachment (Great for Light Dust & Hard-to-Reach Nooks)
If you have a powerful vacuum with the right attachments, this can be a quick option, especially for light dust or getting into crevices.
Step 1: Attach the Right Tool
Use the soft brush attachment (often for furniture or dusting) or the upholstery tool. Ensure the vacuum is set to a low suction setting if possible, to avoid scratching the fan blades. Never use the bare hose end – it can scratch.
Step 2: Vacuum the Top Surface
Hold the vacuum hose firmly. Position the brush attachment flat against the TOP surface of a blade near the motor. Turn the vacuum ON. Gently glide the brush from the center out to the tip, letting the suction pull the dust into the hose. Use slow, overlapping strokes. Repeat for all blades.
Step 3: Vacuum the Bottom Surface
Carefully reposition the brush to clean the BOTTOM surface of each blade, again moving from center to tip. Pay extra attention to the leading edge (front) of the blade, which often catches more dust.
Step 4: Vacuum the Motor Housing
Use the brush attachment to gently vacuum dust from the motor housing vents and surfaces. Be cautious around electrical components. For light kits, use the brush to carefully vacuum around the base of the light sockets (with the fan OFF!).
Step 5: Empty & Clean
Turn the vacuum OFF before moving it. Empty the canister or replace the bag to maintain suction for next time. Wipe down the brush attachment.
Important Note: Vacuuming is less effective for heavy, caked-on dust than the microfiber method. It also doesn’t trap dust as well as microfiber, so some fine particles might get stirred up. Use this for maintenance between deeper cleans.
Method 3: The DIY Cloth-on-a-Stick (Quick & Resourceful)
No special tools? No problem! This method uses household items for a quick touch-up.
Step 1: Secure the Cloth
Take a clean, dry microfiber cloth (an old t-shirt works in a pinch, but microfiber is best). Wrap it tightly around the end of a broom handle, paint stirrer, or even a sturdy yardstick. Secure it firmly with rubber bands, string, or tape. Ensure it’s tight so it doesn’t slip off mid-clean!
Step 2: Dust Top & Bottom Surfaces
Hold the handle firmly. Position the cloth-covered end against the TOP surface of a blade near the motor. Apply light pressure and slide outwards to the tip. Flip the cloth-covered tool to clean the BOTTOM surface of the same blade, again moving center to tip. Repeat for all blades. Re-wrap the cloth if it gets too dusty to avoid spreading grime.
Step 3: Wipe Motor Housing
Use the cloth-covered tool to gently wipe down the motor housing.
Step 4: Shake & Store
Shake the cloth vigorously outside to remove dust. Wash the cloth later. Store your DIY tool for next time.
Limitation: This method requires more frequent cloth changes and isn’t as effective for heavy buildup as the microfiber mop. It’s best for light, regular maintenance.
Troubleshooting Common Ceiling Fan Dusting Problems
Even with the right method, you might encounter a few hiccups. Here’s how to handle them:
Stubborn, Sticky Dust or Grime
If dry dusting isn’t cutting it, lightly dampen a corner of your microfiber cloth with water only or a very mild solution of water and a tiny drop of dish soap. Wring it out *thoroughly* so it’s only slightly damp, not wet. Wipe the affected area gently. Immediately follow with a dry microfiber cloth to remove any moisture. Never spray cleaner directly onto the fan – excess liquid can seep into the motor and cause damage. Avoid harsh chemicals.
Fan Wobbles After Cleaning
This is usually caused by uneven dust removal or accidentally bumping a blade out of alignment. Turn the fan OFF. Gently check if all blades are securely attached to the motor housing (consult your manual if unsure). Use a blade balancing kit (often included with new fans or available cheaply) if wobbling persists. Sometimes, simply turning the fan on high for a few minutes can help it self-balance as the dust settles evenly again.
Can’t Reach the Center/Motor Housing
If your pole isn’t long enough to comfortably reach the very center near the motor, focus on the blades themselves – that’s where most visible dust accumulates. The motor housing collects less dust that affects air quality. If the housing is very dirty, consider carefully using a shorter step stool *only* to gain a few extra inches of reach for the pole, but never stand on a ladder or unstable surface directly under the fan. Safety first!
Dust Keeps Falling on Me/Furniture
This is why the towel/sheet underneath is crucial! Ensure it’s large enough to catch falling dust. Work slowly and methodically. If dust is falling heavily, you might be applying too much pressure – use lighter strokes. Vacuuming method might stir up more dust initially than the microfiber mop.
Keeping Your Ceiling Fan Clean: The Maintenance Plan
The secret to dusting ceiling fans easily is regularity. Don’t wait until the blades are black! Here’s a simple plan:
- Light Dusting (Every 1-2 Weeks): A quick pass with your microfiber duster on a pole (Method 1) takes just 2-3 minutes per fan. Perfect for high-traffic areas or allergy sufferers.
- Thorough Cleaning (Every 3-4 Weeks): Use the full microfiber mop method (Method 1) to clean both sides of all blades and the housing. This prevents heavy buildup.
- Deep Clean (Seasonally or as Needed): If you notice significant dust, stickiness, or reduced airflow, do a more thorough clean. This might involve slightly dampening the microfiber for stubborn spots (as per troubleshooting) or even carefully removing blades for a deeper wash (only if your fan model allows it and you follow the manual).
Pro Tip: Clean your fans when you change your bedsheets or do your weekly vacuuming – it becomes part of your routine and takes minimal extra time.
Conclusion: Breathe Easy with a Clean Fan
Dusting ceiling fans doesn’t have to be a dreaded, ladder-climbing chore. By using the right tools – primarily a microfiber mop or duster on a telescoping pole – you can safely and effectively clean both sides of every blade from the comfort and safety of the floor. Remember the golden rules: always turn the fan OFF and cool, work from the center of the blade out to the tip, and clean regularly to prevent heavy buildup.
Choosing the ladder-free method isn’t just about convenience; it’s about safety and consistency. You’re far more likely to clean your fans regularly when it’s quick and easy, leading to better indoor air quality, a more efficient fan, and a cleaner, healthier home. So grab that microfiber mop, extend that pole, and give your ceiling fans the quick clean they deserve. You’ll enjoy the improved airflow, the cleaner look, and the peace of mind knowing you did it safely – no ladder required!
🎥 Related Video: "Best fan cleaning trick unlocked." 🤣🤪😉 #relatable #comedy #funny #shorts
📺 Radhika Maroo
“Best fan cleaning trick unlocked.” #relatable #comedy #funny #shorts #radhikamaroo.