The ideal study desk height is where your elbows rest at a 90-degree angle when typing. This guide will teach you how to measure and adjust your desk and chair for optimal, pain-free studying. Proper ergonomics prevent back pain, neck strain, and boost productivity.
Key Takeaways
- The 90-Degree Elbow Rule is Key: Your desk height is correct when your forearms are parallel to the floor and elbows are at a 90-100 degree angle while typing.
- Chair Height Comes First: Always set your ergonomic chair height first, then adjust your desk or seating surface to match.
- Monitor Position is Crucial: The top of your screen should be at or slightly below eye level, about an arm’s length away, to prevent neck strain.
- Standard Desks Are Not One-Size-Fits-All: A typical 29-30 inch desk is often too high for average-height users sitting in a proper chair.
- Feet Must Be Supported: Your feet should rest flat on the floor or on a footrest; dangling feet are a major cause of poor posture.
- Adapt for Children and Standing Desks: Kids need adjustable furniture that grows with them, and standing desks should align with your elbow height while standing.
- Accessories Are Essential: A monitor stand, keyboard tray, and footrest are often necessary to achieve perfect ergonomics with a fixed-height desk.
How High Should a Study Desk Be: The Ultimate Ergonomic Guide
Are you experiencing back pain, sore shoulders, or a stiff neck after a long study session? The culprit might be your desk. A poorly sized study desk can wreck your posture and drain your focus. This guide will walk you through the exact steps to find your perfect desk height. You will learn the science of ergonomics, how to measure your body, and smart fixes for any desk. Let’s create a study space that supports your body and your success.
The Golden Rule of Desk Height
Forget guessing. The perfect study desk height follows one simple principle: your elbows should be at a 90 to 100-degree angle when your hands are on the keyboard. Your forearms should be parallel to the floor. This position keeps your shoulders relaxed and wrists straight.
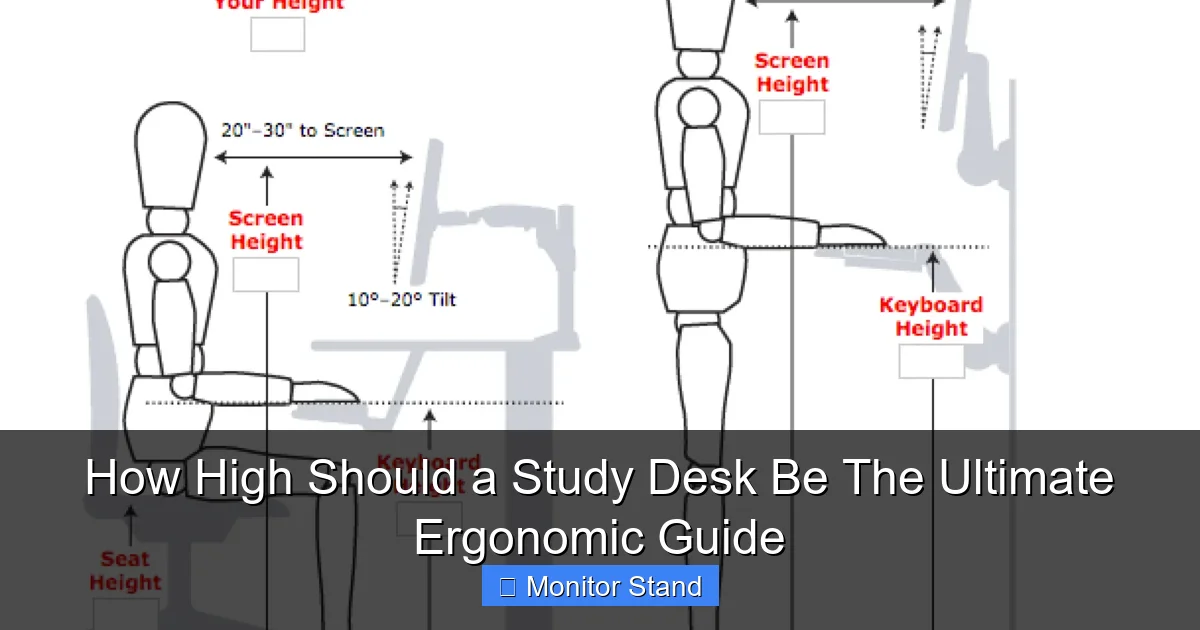
Visual guide about How High Should a Study Desk Be The Ultimate Ergonomic Guide
Image source: physicaltherapyfirst.com
This rule ensures you are not reaching up or hunching down. It is the foundation of a healthy setup. We will build everything else from here.
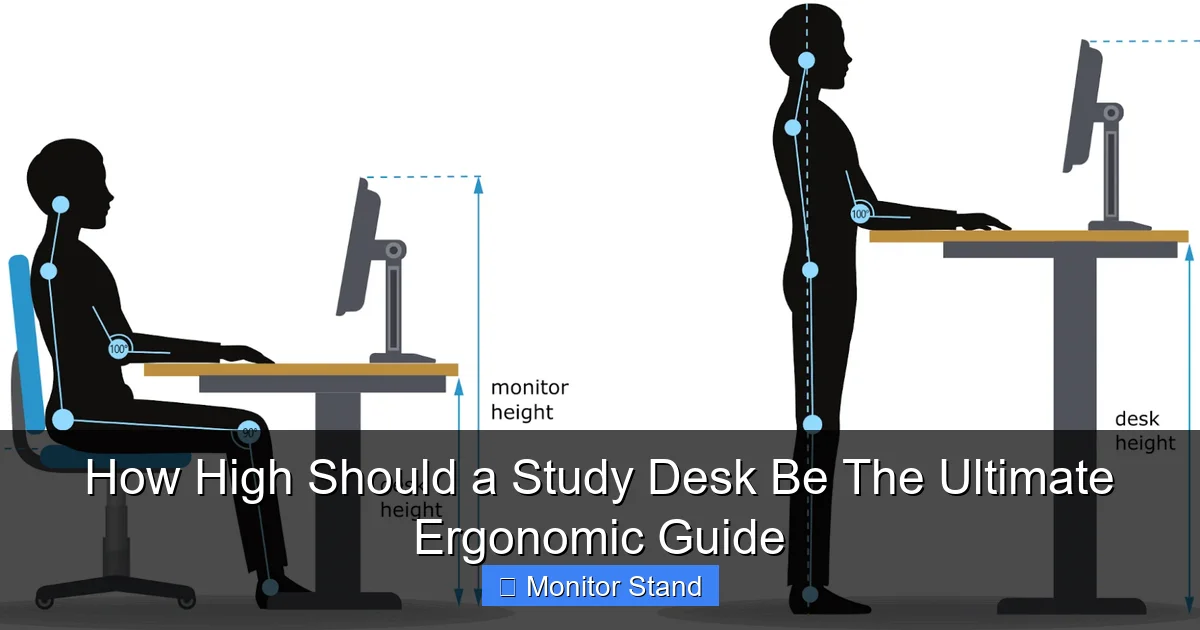
Step 1: Set Up Your Chair Correctly
You cannot set your desk height without first setting your chair. They are a team. Start here.

Visual guide about How High Should a Study Desk Be The Ultimate Ergonomic Guide
Image source: thecaringgirl.com
Adjust Your Seat Height
Sit all the way back in your chair. Adjust the height so your feet are flat on the floor. Your thighs should be parallel to the floor, with a slight gap between the seat and the back of your knees. If your feet dangle, you need a footrest. This is non-negotiable for good posture.
Set the Lumbar Support
If your chair has adjustable lumbar support, position it to fit the natural curve of your lower back. This support prevents slouching and lower back pain.
Adjust the Armrests (If Using)
Armrests should be low enough so they don’t push your shoulders up. Ideally, they should gently support your forearms without forcing your elbows away from your body.
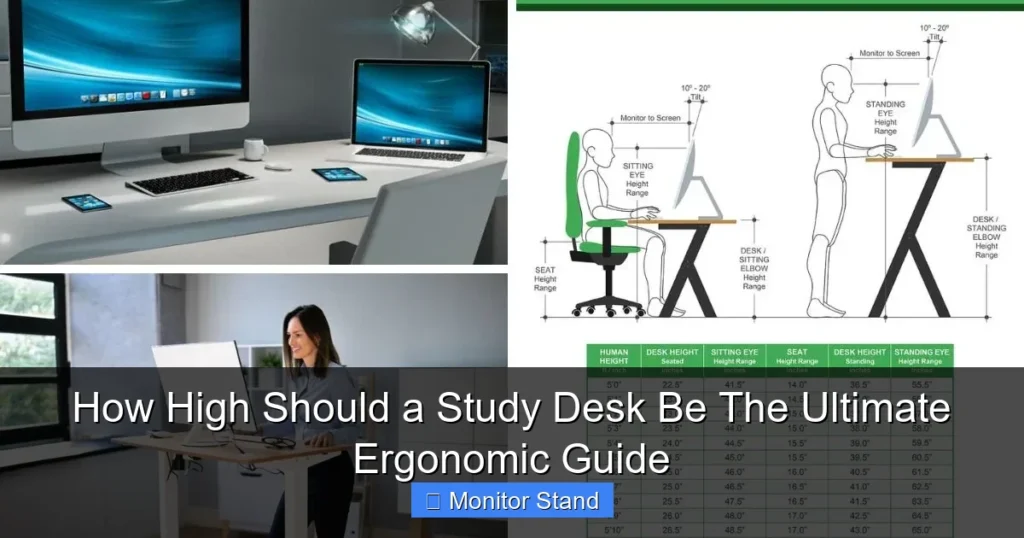
Step 2: Measure Your Ideal Desk Height
Now, with your chair perfectly set, it is time to measure.
Visual guide about How High Should a Study Desk Be The Ultimate Ergonomic Guide
Image source: cdn.inchcalculator.com
The Simple Measurement Method
While sitting in your adjusted chair, relax your shoulders and let your arms hang comfortably at your sides. Bend your elbows to 90 degrees, like you are typing. Have someone measure from the floor to the bottom of your forearm (near the elbow). This measurement is your ideal desk height.
The Standard Desk Height Problem
Most fixed-height desks are 29 to 30 inches tall. For an average-height person (around 5’9″) in a proper chair, this is often too high. It forces you to raise your shoulders, leading to tension. If you are shorter, the problem is worse. This is why accessories are so important.
Step 3: Position Your Monitor with a Stand
Your monitor’s position is just as critical as your desk height. This is where a monitor stand becomes your best friend.
Find the Correct Eye Level
Sit back in your chair and look straight ahead. The top third of your monitor screen should be level with your natural sightline. You should look slightly down at the center of the screen. This prevents you from craning your neck up or down.
Use the Arm’s Length Rule
Your monitor should be about an arm’s length away from your body. You should be able to comfortably read text without leaning forward.
How a Monitor Stand Helps
A monitor stand lifts your screen to the perfect height. It also frees up valuable desk space underneath. For laptops, a stand is essential to raise the screen to eye level. You must then use an external keyboard and mouse to maintain the 90-degree elbow rule.
Step 4: Adjust for Your Specific Body
Everyone is different. Let’s tailor the setup.
For Taller Individuals
If you are over 6 feet tall, a standard 30-inch desk might actually work. But your main challenge is legroom. Ensure the desk has clear space underneath. You may need a taller monitor stand to achieve proper eye level.
For Shorter Individuals
If you are under 5’5″, a standard desk will likely be too high. Your solutions are a height-adjustable desk, a keyboard tray mounted underneath the desk, or a chair that can be raised with a solid footrest.
For Children and Students
Kids grow fast. An adjustable chair and desk are the best investments. As a rule, when seated, their feet should be flat, knees at 90 degrees, and elbows at desk level. Their monitor should also be at eye level, not on a tall desk.
Step 5: Choose the Right Accessories
You can make almost any desk ergonomic with the right tools.
- Keyboard Tray: This is a game-changer for fixed-height desks. A tray mounts underneath, allowing you to lower the keyboard to the perfect elbow height.
- Footrest: Essential if your feet don’t touch the floor after chair adjustment. It provides support and improves circulation.
- Document Holder: Place it next to your monitor at a similar height. This stops you from constantly looking down at your desk, straining your neck.
- Ergonomic Chair: A chair with good lumbar support, seat height adjustment, and seat depth adjustment is the foundation of your setup.
Troubleshooting Common Problems
What if something still hurts? Here are quick fixes.
Problem: Shoulders Feel Hunched or Tired
Solution: Your desk is too high. Lower your chair and add a footrest to keep your feet supported. If you can’t lower the desk, install a keyboard tray.
Problem: Wrist Pain or Numbness
Solution: Your wrists are bent upwards or downwards. Ensure they are in a neutral, straight line with your forearms. A slim, padded wrist rest can help. Check that your keyboard is at elbow height.
Problem: Neck Pain or Stiffness
Solution: Your monitor is at the wrong height or distance. Use a monitor stand to raise it to eye level. Make sure you are not leaning your head forward to see the screen.
Problem: Lower Back Pain
Solution: You are likely slouching. Adjust your chair’s lumbar support. Ensure your hips are slightly higher than your knees. Your feet must be supported.
Consider a Standing Desk
Standing desks offer great flexibility. The principle is similar: your elbows should be at 90 degrees when typing. The desk surface should be at your standing elbow height. Remember to alternate between sitting and standing. An anti-fatigue mat is a must for comfort.
Conclusion: Build Your Productive Sanctuary
Finding the right study desk height is not about luxury. It is about health and efficiency. By following the 90-degree elbow rule, prioritizing your chair setup, and using tools like monitor stands and footrests, you can transform any space. Listen to your body. Discomfort is a signal to adjust. A perfectly ergonomic study desk reduces fatigue, prevents injury, and helps you focus on what truly matters: learning and achieving your goals. Start measuring today—your back and your grades will thank you.