
Many parents wonder, can baby jumpers cause hip dysplasia? The short answer is that improper or prolonged use can contribute to hip stress and development issues. This guide explains the science of hip dysplasia, how to choose and use jumpers safely, and highlights crucial alternatives to ensure your baby’s healthy growth.
Key Takeaways
- Position is Paramount: Hip dysplasia risk in jumpers is linked to the “frog-leg” or wide-stance position that puts pressure on the hip sockets.
- Timing is Everything: Jumpers should never be used before a baby can hold their head up steadily, typically not before 4-6 months, and only for very short periods.
- Not All Jumpers Are Equal: Look for jumpers with adjustable, ergonomic seats that support hips and thighs parallel, avoiding models where legs dangle or spread too wide.
- It’s About Moderation: Jumpers are entertainment devices, not development tools. Limit use to 10-15 minutes, 1-2 times daily, under close supervision.
- Floor Time is Best: Unrestricted floor play (tummy time, rolling) is the safest and most beneficial activity for motor development and healthy hips.
- Know the Risk Factors: Be extra cautious with jumpers if your baby was breech, has a family history of hip dysplasia, or shows signs like uneven leg folds.
- Consult Your Pediatrician: Always discuss container device use with your child’s doctor, especially if you have any concerns about their hip or leg development.
Baby Jumpers and Hip Dysplasia Risks Explained: A Parent’s Guide
As a new parent, you want the best for your baby. You also need a safe place to put them for a few minutes. Baby jumpers seem like a perfect solution. They are fun and engaging. But a big question pops up. Can baby jumpers cause hip dysplasia? The answer is not a simple yes or no. It is about how and when you use them.
This guide will walk you through everything. You will learn what hip dysplasia is. You will see how jumpers might play a role. Most importantly, you will get clear, step-by-step advice. This advice will help you make safe choices for your baby’s hip health. Let’s jump in.
Understanding Hip Dysplasia: The Basics
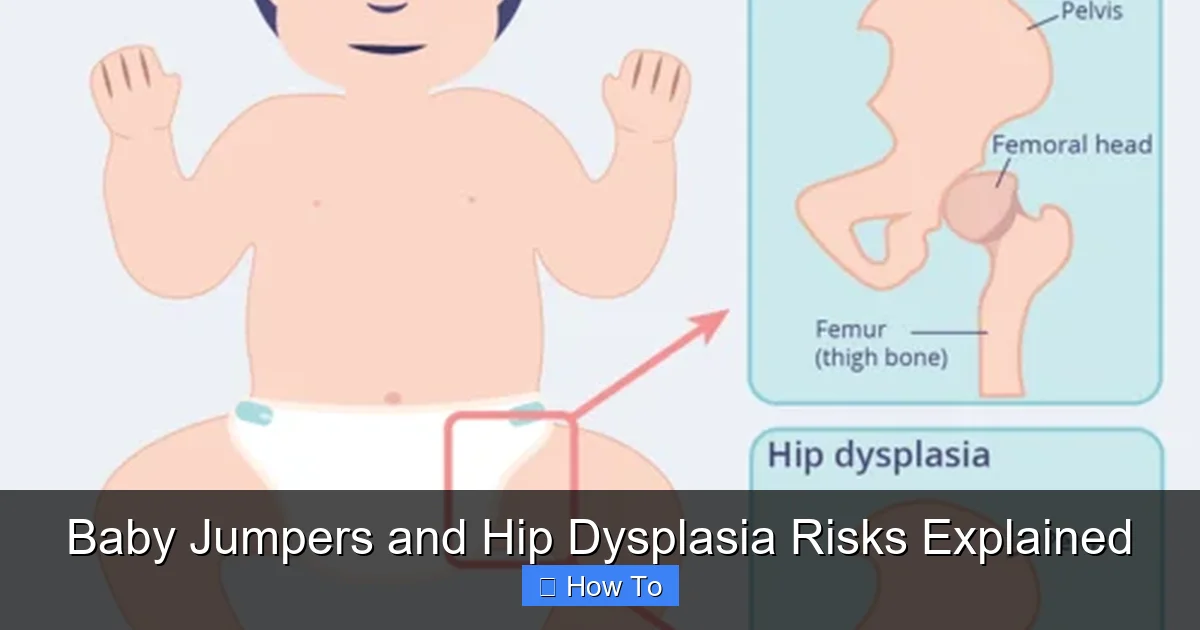
First, let’s talk about hip dysplasia. It sounds complex. But it is simple to understand. Developmental Dysplasia of the Hip (DDH) is a condition. In DDH, the hip joint does not form properly. The ball (the top of the thigh bone) does not fit snugly into the socket (part of the pelvis).
Visual guide about Baby Jumpers and Hip Dysplasia Risks Explained
Image source: media.healthdirect.org.au
This can range from loose ligaments to a full dislocation. Hips are made of soft cartilage in newborns. They slowly harden into bone over the first year. The proper position helps the socket form deeply around the ball. The wrong position can guide the socket to form shallowly.
Why are babies prone to this? Their hip joints are very flexible at birth. This allows for the birthing process. But it also means the joint is easily guided by positioning. The goal is to keep the hip in a stable, healthy position during this critical window of development.
The Link Between Baby Jumpers and Hip Position
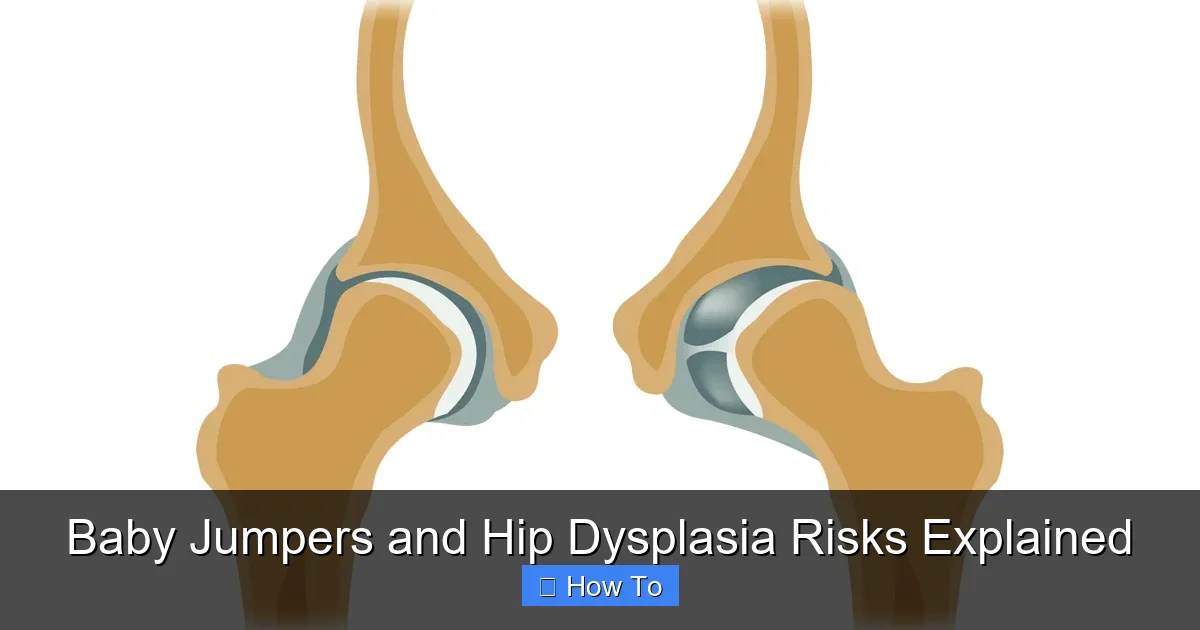
Now, let’s connect this to baby jumpers. Traditional jumpers have a suspended seat. The baby sits with their legs apart. Their weight rests on their pelvis and crotch. Their legs often hang down or push outwards. This is sometimes called the “frog-leg” position.
Visual guide about Baby Jumpers and Hip Dysplasia Risks Explained
Image source: c8.alamy.com
This position can be problematic. It does not support the thighs. The thigh bones are not held securely in the hip socket. Instead, this position can put pressure on the socket rim. It may encourage the ball to sit improperly. Over long periods, this could influence how the soft socket forms.
Think of it like a soft clay mold. If you press a ball into clay at the right angle, you get a deep, round impression. If the ball is at a odd angle with pressure on the rim, the impression becomes shallow or misshapen. The baby’s hip socket is like that clay for the first several months.
How To Choose a Hip-Healthy Baby Jumper (If You Use One)
You might still choose to use a jumper. Many parents do. If so, selecting the right model is your first critical step. Not all jumpers are created equal for hip health.
Visual guide about Baby Jumpers and Hip Dysplasia Risks Explained
Image source: aurorahealthcare.org
Step 1: Look for an Ergonomically Designed Seat
Forget the classic sling-style seat. You want a jumper with a wide, supportive seat. The best seats look more like a small chair. They should support your baby’s thighs along their length. The goal is to keep the thighs roughly horizontal or at a slight downward angle. This helps keep the hip ball centered in the socket.
Good Example: Jumpers with a solid, molded seat that cradles the bum and thighs.
Bad Example: Jumpers with a narrow, fabric harness seat where the baby’s legs dangle straight down from the crotch.
Step 2: Ensure Full Adjustability
The jumper must grow with your baby. Check the height adjustments. Your baby’s feet should be flat on the floor. Not on tiptoes. Not so low that they have to crouch. Their knees should be slightly bent when standing in it. Proper foot placement distributes force better.
Step 3: Avoid Excessive Bouncing Aids
Some jumpers have very strong springs. They propel the baby high. This can lead to hard, jarring landings. Look for a model with gentle bounce resistance. The baby’s own leg muscles should power the movement. This is safer for joints and more developmentally appropriate.
How To Use a Baby Jumper Safely: A Step-by-Step Guide
Choosing a good jumper is half the battle. Using it correctly is the other half. Follow these steps for maximum safety.
Step 1: Wait for the Right Time
Do not rush. Your baby must have full head control. This usually happens between 4 and 6 months. They should be able to hold their head up steady without wobbling. Their back should also be stronger. Placing a baby in a jumper too early forces their spine and hips into a position they are not ready for.
Step 2: Practice Short, Supervised Sessions
This is the golden rule. Limit jumper time to 10-15 minutes per session. And no more than 1-2 sessions per day. Set a timer. It is easy to lose track of time. Never use the jumper as a long-term babysitter. Your baby should always be in your sight and within hearing distance.
Step 3: Position Your Baby Correctly
Every time you place them in, do a quick check.
- Feet Flat: Adjust the height so both feet are flat on the ground.
- Knees Bent: There should be a gentle bend at the knees.
- Hips Supported: The seat should be snug under their thighs, not just at the crotch.
- Toys at Chest Level: The activity tray should be at chest height, not forcing them to over-reach.
Step 4: Know When to Stop
Stop using the jumper if your baby shows signs of discomfort. Also stop if they can walk while holding onto furniture. Or if their head reaches the top of the frame. Most babies outgrow jumpers by 10-12 months.
Essential Alternatives to Baby Jumpers
The safest space for a baby’s development is the floor. Here are superior alternatives that promote hip health.
Alternative 1: Unrestricted Floor Play
This is the best exercise. Place a blanket on the floor. Let your baby do tummy time. Let them roll, pivot, and eventually crawl. This strengthens their core, neck, back, and leg muscles naturally. It allows their hips to move through a full, healthy range of motion.
Alternative 2: A High-Quality Activity Gym
These have dangling toys. Your baby can bat at them while on their back or during tummy time. It encourages movement without restricting their posture.
Alternative 3: A Secure, Stationary Activity Center
These look like jumpers but do not bounce or jump. The baby sits in a 360-degree rotating seat on a stable base. They can spin, bounce gently with their legs, and play with toys. Look for models with an adjustable, supportive seat that allows for better hip positioning than a sling-seat jumper.
Troubleshooting Common Concerns and Mistakes
Even with good intentions, mistakes happen. Let’s troubleshoot.
Problem: My Baby Only Seems Happy in the Jumper
Solution: This is common. The jumper is very stimulating. Wean off slowly. Reduce time by 2 minutes each day. Increase engaging floor play. Get down on the floor with them. Use new toys or mirrors to make floor time more fun.
Problem: My Baby’s Legs Look “Bowed” After Using a Jumper
Solution: A slight bow is normal in infants. But if you are concerned, stop using the jumper immediately. Focus on floor play. Mention it to your pediatrician at the next visit. They can check for true bowing versus normal development.
Problem: I Used an Older, Hand-Me-Down Jumper for Months
Solution: Don’t panic. Many babies use jumpers without issue. Simply stop using it now. Switch to the safer alternatives. At your baby’s next well-visit, ask your doctor to check their hips. They can perform a simple physical exam to check for stability.
Conclusion: Balance and Awareness Are Key
So, can baby jumpers cause hip dysplasia? The risk is real but manageable. It is not about banning them outright. It is about informed and minimal use. The main cause of hip dysplasia is genetics and fetal position. But improper use of containers like jumpers can be a contributing factor.
Your baby’s hip development is a short, critical window. Prioritize free movement on the floor. If you use a jumper, be picky about the model. Be strict about the clock. Always put safety and development before convenience.
When in doubt, talk to your pediatrician. They know your baby’s history. They can give you personalized advice. Your awareness is the first and best step toward protecting your baby’s healthy growth.
🎥 Related Video: Hip dysplasia clinical examination by Ryan Lisle, HollywoodOrthopaedicGroup. Healthy Hips Australia.
📺 Sarah Twomey
Ryan Lisle, orthopaedic surgeon at Hollywood Orthopaedic Group demonstrates a hip examination using the Barlow’s Test and …